Model List:


Family | Model | SoC | Memory | Form Factor | Ethernet | Wi-Fi | USB | GPIO | Released |
|---|---|---|---|---|---|---|---|---|---|
Raspberry Pi | B | BCM2835 | 256 MB | Standard | Yes | No | 26-pin | 2012 | |
512 MB | 2012 | ||||||||
A | 256 MB | No | 2013 | ||||||
B+ | 512 MB | Yes | 40-pin | 2014 | |||||
A+ | Compact | No | |||||||
Raspberry Pi 2 | B | BCM2836 / 7 | 1 GB | Standard | Yes | No | 2015 | ||
Raspberry Pi Zero | Zero | BCM2835 | 512 MB | Ultra-compact | No | No | |||
W / WH | Yes | 2017 | |||||||
2 W | BCM2710A1 | 2021 | |||||||
Raspberry Pi 3 | B | BCM2837A0 / B0 | 1 GB | Standard | Yes | Yes | 2016 | ||
A+ | BCM2837B0 | 512 MB | Compact | No | Yes | 2018 | |||
B+ | 1 GB | Standard | Yes | 2018 | |||||
Raspberry Pi 4 | B | BCM2711 | 1 GB | Standard | Yes | Yes | 2 X USB 3.0 ports 2 X USB 2.0 ports. | 2019 | |
2021 | |||||||||
2 GB | 2019 | ||||||||
4 GB | |||||||||
8 GB | 2020 | ||||||||
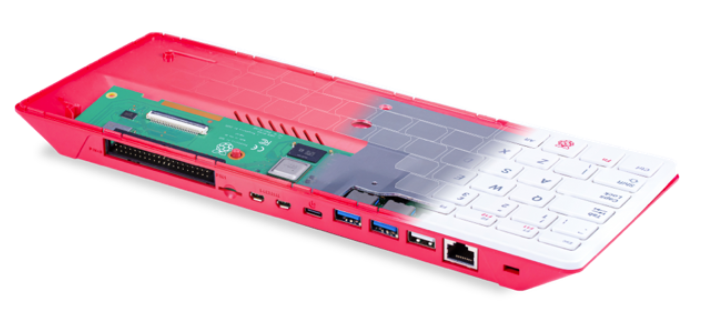
400 | 4 GB | Keyboard | 2 × USB 3.0 1 × USB 2.0 ports | ||||||
CM4 | Standard | NO | YES | NO | |||||
Raspberry Pi Pico | Pico | RP2040 | 264 KB | Pico | No | No | 2021 | ||
W | Yes | 1 × | 2022 |
Raspberry Pi OS
Raspberry Pi OS with desktop (32-bit)
Raspberry Pi OS (64-bit)
Raspberry Pi OS (Legacy 32-bit)
Raspberry Pi官方推薦第三方作業系統
Ubuntu MATE - 2016年4月由官網推出Raspberry Pi版本。
Ubuntu Core - Ubuntu的開發由英國Canonical有限公司主導,南非企業家Mark Shuttleworth所創Canonical透過銷售與Ubuntu相關的技術支援和其他服務來產生收益。
Ubuntu Server - 自Ubuntu 5.10版(Breezy Badger)起,與電腦版同步發行,可當作多種軟體伺服器,如電子郵件伺服器、基於LAMP的Web網站伺服器、DNS伺服器、檔案伺服器與資料庫伺服器等。伺服器版通常不預裝任何桌面環境,與電腦版本相比,佔用空間少,執行時對硬體要求較低,最少只需要500MB硬碟空間和64MB記憶體。
OSMC[33] - OSMC成立於2014年, 是一個以Linux核心的免費開源媒體播放器, 可讓你從本地網路儲存裝置和Internet播放媒體。LibreELEC[34] - LibreELEC是專為Kodi在當前的媒體中心硬體上構建的輕量級❝剛剛足夠的操作系統❞Linux發行版。
Mozilla WebThings- Mozilla WebThings是Mozilla的Web of Things的開源實現,包括WebThings Gateway和WebThings框架。
PiNet - Raspberry Pi教室的免費和開源集中式使用者帳戶和檔案儲存用Linux。
RISC OS - 在2011年,一個移植的Cortex-A9 PandaBoard已宣布和樹莓派在公眾場合露面的開發版本可免費下載的候選發布版已跟進,這版本已免費提供樹莓派使用者。
Weather Station - Raspberry Pi Oracle Weather Station的Raspbian映像檔。
IchigoJam RPi - 將Raspberry Pi直接引導到IchigoJam BASIC介面運作。
其他作業系統
Windows 10 IoT Core - "Windows 10 IoT 核心版"為微軟提供的免費 Windows 10版本,,在樹莓派2以上版本都可運作正常。[40]
Windows 10 ARM - Windows 10在ARM64平台上的版本,提供仿32和仿64的X86應用程式模擬運行。
Windows 11 ARM - Windows 11在ARM64所推出的版本,提供仿64的X86應用程式模擬運行。
Arch Linux ARM - 非官方支援,由Arch Linux ARM計畫維護。
Pidora - 為 Raspberry Pi移植的Fedora的重製版本。
Puppy Linux - 是一個小型的Linux獨立發行版。包含SeaMonkey, AbiWord, Gnumeric, Gxine/xine等應用程式。 該發行版現由Barry Kauler等維護。
openSUSE - 前身爲SUSE Linux和SuSE Linux Professional,是一個Linux發行版與項目,由SUSE Linux GmBH與其他公司贊助。
Fedora Remix - 是較具知名度的Linux發行套件之一,由Fedora計畫社群開發、紅帽公司贊助,目標是建立一套新穎、多功能並且自由(開放原始碼)的作業系統。
Slackware ARM - 是Slackware Linux, Inc的Patrick Volkerding製作的Linux發行版本。它力圖成為「UNIX風格」的Linux發行版本。它的方針是只吸收穩定版本的應用程式,並且缺少其他Linux版本中那些為發行版本客製化的組態工具。
FreeBSD 與 NetBSD - BSD中較為普遍使用的作業系統.
Plan 9 from Bell Labs - 貝爾實驗室九號計畫是一個分散式作業系統,由貝爾實驗室的計算科學研究中心在1980年代中期至2002年開發,以作為UNIX的後繼者。它現在仍然被作業系統的研究者和愛好者開發使用。
Moebius[41] - 以Debian藍圖設計的輕量級ARM HF發行版。 它使用Raspbian儲存庫可容納128 GB SD卡。 它僅具有最少的服務,並且其記憶體使用已優化以保持較小的佔用空間。
OpenWrt - 經常運用在嵌入式裝置上,用來路由網路傳輸。
Kali Linux - 一個由Debian衍生出來的發行版,設計用來做數位取證和滲透測試。
Pardus ARM[42] - 一個基於Debian的作業系統,也是Pardus的輕量級版本。
Instant WebKiosk[43] - Instant WebKiosk是基於Debian GNU / Linux的作業系統。Binary Emotions完全專注於Raspberry Pi操作系統。
Minepeon[44] - 是用於挖掘加密貨幣的專用操作系統。
Kano OS[45] - 一個為專為兒童使用者製作的操作系統。
Nard SDK[46] - Nard GNU / Linux是Raspberry Pi的軟體開發套件(SDK) 。與「普通」 Linux發行版不同,Nard 完全旨在開發可在遠程位置晝夜運行的 嵌入式作業系統。Nard在 Raspberry Pi中的運行方式類似於PC中的 Live USB。在啟動過程中,所有內容都上傳到RAM並從那裡執行。
Sailfish OS - 是一個以Linux為基礎的開放原始碼作業系統,主要用於行動裝置,由諾基亞前員工成立的Jolla公司在諾基亞於2011年放棄的MeeGo系統的社區開發Mer計畫基礎上開發而來。
Tiny Core Linux - Tiny Core Linux是一個基於Linux4.x版本核心,採用BusyBox、Tiny X、FLTK 和其它小型軟體構築的帶圖形化使用者介面的微型Linux作業系統。由於體積很小,大約10MB,故採用整體裝載入RAM的方式執行,速度很快。
IPFire[47] - IPFire 是一個關注於安全的 Linux 發行版,其應用場景是當路由器和防火牆,其配有直觀的 Web管理介面,僅在Raspberry Pi 1上運行; 目前暫不計劃移植到Raspberry Pi 2以上版本。
xv6 - xv6是在ANSI C中針對多處理器x86系統的Unix第六版。
與數位媒體中心有關的作業系統:OpenELEC,Xbian[48],Rasplex[49],LibreELEC[50]
與音樂有關的作業系統:Volumio[51],Pimusicbox[52],Runeaudio[53],moOdeaudio[54]。
與復古電動遊戲有關的作業系統:Retropie[55],Recalbox[56],Happi Game Center[57],Lakka[58],ChameleonPi[59],Piplay[60]。
USB interface of Raspberry Pi 4
The Raspberry Pi 4 contains two USB 3.0 ports and two USB 2.0 ports which are connected to a VL805 USB controller. The USB 2.0 lines on all four ports are connected to a single USB 2.0 hub within the VL805: this limits the total available bandwidth for USB 1.1 and USB 2.0 devices to that of a single USB 2.0 port.
On the Raspberry Pi 4, the USB controller used on previous models is located on the USB type C port and is disabled by default.
Known USB Issues
Interoperability with USB 3.0 hubs
There is an issue with USB 3.0 hubs in conjunction with the use of full or low speed devices, including most mice and keyboards. A bug in most USB 3.0 hub hardware means that the models prior to Raspberry Pi 4 cannot talk to full or low speed devices connected to a USB 3.0 hub.
USB 2.0 high speed devices, including USB 2.0 hubs, operate correctly when connected via a USB 3.0 hub.
Avoid connecting low or full speed devices into a USB 3.0 hub. As a workaround, plug a USB 2.0 hub into the downstream port of the USB 3.0 hub and connect the low speed device, or use a USB 2.0 hub between the Raspberry Pi and the USB 3.0 hub, then plug low speed devices into the USB 2.0 hub.
Single TT USB hubs
USB 2.0 and 3.0 hubs have a mechanism for talking to full or low speed devices connected to their downstream ports called a transaction translator (TT). This device buffers high speed requests from the host and transmits them at full or low speed to the downstream device. Two configurations of hub are allowed by the USB specification: Single TT (one TT for all ports) and Multi TT (one TT per port). Because of a hardware limitation, if too many full or low speed devices are plugged into a single TT hub, the devices may behave unreliably. It is recommended to use a Multi TT hub to interface with multiple full and low speed devices. As a workaround, spread full and low speed devices out between the Raspberry Pi’s own USB port and the single TT hub.
Raspberry PI 4B 有兩個USB 3.0及2個USB2.0 的接孔。全部連接到VL805 USB 控制器上。全部四個端口上的USB 2.0的都接到VL805內的單 USB 2.0 hub 上,所以四個USB 2.0 的頻寬等於一個USB 2.0的頻寬 (480Mbps),
其中VL805 使用的是PCI Express 2.0 X1,該接口可用頻寬是 500MB/s (4Gpbs)。所以該USB controller 總頻寬就是4Gbps, 但是USB 3.0的速率為5Gbps, 也就是說達不到最高速率。只能實現約80 %的速度。如果兩個USB 3.0 同時使用,可用的頻寬會更低。
Raspberry PI Zero, 1, 2, 3這些之前的型號都只支持一個root USB port, 所有的USB設備數據會集中在這個單一線路上,該線最高運行速度為480 Mbps.
VIA VL805 是一個單晶片的USB 3.0 主機控制品,啟用了PIC Express 與 USB (5Gpbs的超高速),高速 (480 Mbps)的,全速 (12 Mbps)的 搭載平台,和低速(1.5 Mbps)的裝置,Root Hub包括了四個下行端口,從而實現同時運行多個外設。
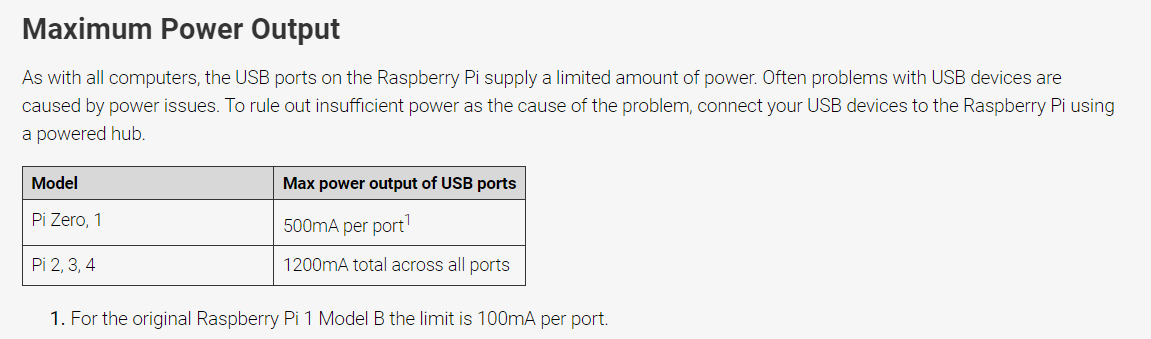
Raspberry USB 口供電問題.
Raspberry PI Zero, 1 的USB 供電是每個Port 500mA, Raspberry PI 2, 3, 4 的USB port 是全部的USB 埠加起來1200mA.
Reference:
https://zh.wikipedia.org/zh-tw/%E6%A0%91%E8%8E%93%E6%B4%BE
https://www.raspberrypi.com/documentation/computers/raspberry-pi.html#maximum-power-output


